Permissions
Before you start to configure the initial settings, you will need to ensure you have been assigned the “Time Admin” Permission Set.
The best practice for this assignment is to create a Security Groups named something similar to “Time Users”, “Time Admins”, and “Time Auditors”, assign the corresponding Permission Set to that group, and then put all users that will be using the system into one or more of those groups.
This app comes with three Permission Sets. For the system to function properly, all users who use any functionality of the Time app must be assigned the Permission Set “Time User“.
Users that will be administering the system and running reports on everyone’s labor will also need to be assigned the Permission Set “Time Admin.”
There is a Permission Set named “Time Audit“. This permission set gives full read access to all time data, for audit purposes.
Configuration
To configure the Time system, start by navigating to the “Time Admin” page or Role Center page and then to the Configuration tab group. For each link within the Configuration tab group, read and follow the instructions provided below.
Settings
RollOver / CarryOver
Logical New Years Month
The month in which the new year starts for time off calculations. This may be the same as your fiscal new year, but does not have to be.
CarryOver Usage Deadline
BC Time allows for companies to decide if employees are permitted to roll over unused time off days. The Usage Deadline can be configured to mandate all rollover days be used by a deadline.
If you wish for there to be no deadline, set the Month and Day to the last day of the previous month specified in the Logical New Years Month. (Last Day of the Year)
Usage Deadline Month
The month in which rollover time must be used by. This works with the Usage Deadline Day (Rollover Usage Cutoff Day).
Usage Deadline Day
The day of the month in which rollover time must be used by. This works with the Rollover Deadline Month (Rollover Usage Cutoff Month)
Paid Time Off (PTO)
Paid Time Off is something that many companies use. This avoids confusion of Personal, Sick, Vacation, or other types of paid time off, and when each can be taken. Employees find one bucket of Paid Time Off more beneficial, because they don’t have to pretend they are sick if they have a need to have a day off and have used up their personal days.
PTO can be used by itself or can be used with either Personal and/or Sick time off.
Use PTO
Enables or disables the usage of Paid Time Off (PTO). If this option is turned off, the other options for PTO will not be used.
Allow Payout (PTO)
Allow employees to be paid out for unused PTO. When this option is enabled, employees will have a request type of PTO Time Payout, where they may request to be paid out for unused PTO. A report can be run at the end of the year to view these requests.
Max Payout Days (PTO)
The maximum number of PTO days that may be paid out. If this is set to zero days and the Allow Payout option is turned on, employees will not be able to submit PTO Time Payout requests.
Allow Rollover (PTO)Allow Employees to roll over unused PTO time to the next year. When this option is enabled, unused PTO time will be rolled over to the next year, up to the amount specified for Max. Rollover Days.
Max. Rollover Days (PTO)The maximum number of PTO days an employee is permitted to roll over. This setting does not apply if the Allow Rollover (PTO) option is not enabled.
Personal Time
Personal Time can be used in any combination with Paid Time Off (PTO) and Sick Time. The options for Personal Time are the same as for PTO, see the descriptions above.
Sick Time
Sick Time can be used in any combination with Paid Time Off (PTO) and Personal Time. The options for Sick Time are the same as for PTO, see the descriptions above.
Maximum Payout & Rollover Days
Max. Payout Days
The maximum number of any type of payout days. This sets the maximum number of days that can be paid out at the end of the year. For example; if 5 PTO payout days are allowed, and 5 Personal payout days are allowed, and 5 Sick payout days are allowed, and this setting is set to 5 Days, only 5 days will be allowed to be paid out between all of the payout options. So, if you truly wish for the employees to have 15 days of payout available, this option must be set to 15 days.
Max. Rollover Days
The maximum number of any type of Rollover days. This sets the maximum number of days that can be rolled over to the next year. For example; if 5 PTO rollover days are allowed, and 5 Personal rollover days are allowed, and 5 Sick rollover days are allowed, and this setting is set to 5 Days, only 5 days will be allowed to be rolled over between all of the payout options. So, if you truly wish for the employees to have 15 days of rollover available, this option must be set to 15 days.
Rollover/Payout Priority
At the end of the year, the Rollover Worksheet is run. When calculating, these priority settings determine the order in which rollover days occur.
Priority Selection
The order in which recommendations are made for rollover/payouts on the Rollover Worksheet when it is run at the end of the year.
Rollover/Payout Rules
Force Rollover Before Payout
Ensures that all rollover time is rolled over before payout is allowed.
Approval & Notifications
Use Email NotificationsEnables or Disables the sending of all email notifications. If this is turned off, all other settings to send notifications will be ignored.
Allow Approvers to see All Company Time Off
If this is turned on, approvers will be able to see all time off requests for the company. If this is off the approver will only see their own group employees.
Approver Management of Time Off
When turned on, group approvers can un-approve and delete time off type entries. If this is not selected, only an admin can un-approve.
Allow Approvers to Edit Submitted
Allow approvers to edit entries that are in the Submitted status. When an approver edits an entry, the original entry is soft-deleted and retained for auditability, and a new duplicate entry is created for editing.
Allow Approvers to Un-Approve
Allows approvers to Un-Approve time. If this setting is turned off, only an admin may Un-approve time entries.
Time Entry
First Day Of Week
Sets the first day of the week for displays, reports, and calculations.
Submission Cutoff Date
No time requests can be submitted before this date. This date should be set when payroll is performed, to ensure someone does not submit time before that date, and not get paid.
Use Overnight
Allows employee to designate if they stayed overnight away from home. This is useful if your company pays employees a stipend when away from home overnight. Employees may designate ‘Overnight’ on a time entry for the day. This count may be displayed on reports. When this option is turned on, the ‘Overnight’ checkbox will be visible on time entries.
Restrict Holiday Requests
Restrict Holiday Requests to days specified by the company as Public Holidays.
Require Paid Time Off First
Require All Paid Time to be used before Unpaid Time is allowed.
Allow Time Off on Holiday
When enabled, employees may charge PTO, Sick, or Personal time on a company observed public holiday.
Prevent Missed Open Requests
Prevent submit of request if there are unsubmitted or rejected requests from previous days.
Job
Allow Job Dynamic Time
When enabled time may be dynamically charged to a job, without requiring a resource job planning line to be already set up. When this is enabled, the option will be available on each job card to enable. When enabled on the job card, it will be available on each task to be enabled.
Dynamic Time Description
When dynamic labor is added to a job’s task, it will come in with this description. If this is blank, the resources name will be used. You can include %1 where you want the resource’s name to be, %2 where you want the resource’s Resource No. to be, and %3 where you want the BCTime Request Date to be.
Example: Actual work done by %1.
Production
Allow Charge Wait Time
Allows for users to specify Wait Time on a Production Order operation during time entry. This time will be added to the run time during posting to increase production cost.
Allow Charge Move Time
Allows for users to specify Move Time on a Production Order operation during time entry. This time will be added to the run time during posting to increase production cost.
Require Scrap Code
Require a Scrap Code be specified when entering a scrap quantity on a production order operation.
Posting
Job
Use Job Planning Line Cost for Resources
When disabled job costs will come from the resource card when time is approved. When this setting is enabled, time will be approved at the cost indicated on the Job Planning Line.
Allow Actual Time
When this is on, Job Planning Lines will have the capability to be flagged as ‘Actual Time’: Remaining hours will be set to zero when time is posed to the job planning line. This is used for ‘Time and Material’ (Actual Quantity) type charging of labor. The Quantity field will always equal the Actual Posted, after time is posted the first time.
Production
Require Shortcut Dimension 1
Before time can be submitted, the Production Order is checked to ensure Shortcut Dimension 1 has a value.
Require Shortcut Dimension 2
Before time can be submitted, the Production Order is checked to ensure Shortcut Dimension 2 has a value.
Prevent Over Production
Prevents output on the last operation from exceeding the expected output of the Production Order Line.
Rate Schedule
Hourly Overtime Threshold
For hourly employees, overtime rate starts after these many hours in a week.
Salary Overtime Threshold
For salary employees, overtime rate starts after these many hours in a week.
Out of Office
For instructions on setting up the Out Of Office functionality, please read the knowledge base article: Setting Up Out of Office.
Tenant ID
Your Microsoft 365 Tenant ID. This is represented as a guid unique identifier.
Application ID
Application ID, as indicated in the Azure App Registration. This is represented as a GUID unique identifier.
Client Secret (Not Shown)
The API secret given when the Azure App Registration was created. After the value is entered, the text box will be blanked out. You can verify the password is correct by testing it. The Secret Hint field will show the first three characters of the secret so you may know which secret has been used.
Secret Hint
Shows the first three characters of the secret as a hint to the one used.
Job Related
Execution Hours Field No.
Specifies the value of the Execution Hours Field No. field. The Execution Hours field is used on Job Planning Lines to specify the budgeted number of hours a resource is given to complete the resource’s plan. The Execution Hours is shown on the resource’s Job Responsibilities page part. BC Time comes with a field to specify Execution Hours, but a different field can be specified if a different field is desired.
Execution Hrs. Field Capt.
Specifies the caption of the Execution Hours field.
Finished Plan Security Group
Only the people in this security group may manage (uncheck) the Job Planning Line’s Finished status. If this is left blank, this security is not applied.
Add Job Resource Sec. Group
Only the people in this security group may add Job Planning Lines of type Resource for any job. If this is left blank, this security is not applied.
Project Manager can Add Resources
If enabled, the Project Manager for the Job is allowed to add Job Planning Lines of type Resource. This bypasses the Add Job Resource Sec. Group setting for the project manager assigned to the Job.
Overtime Rates
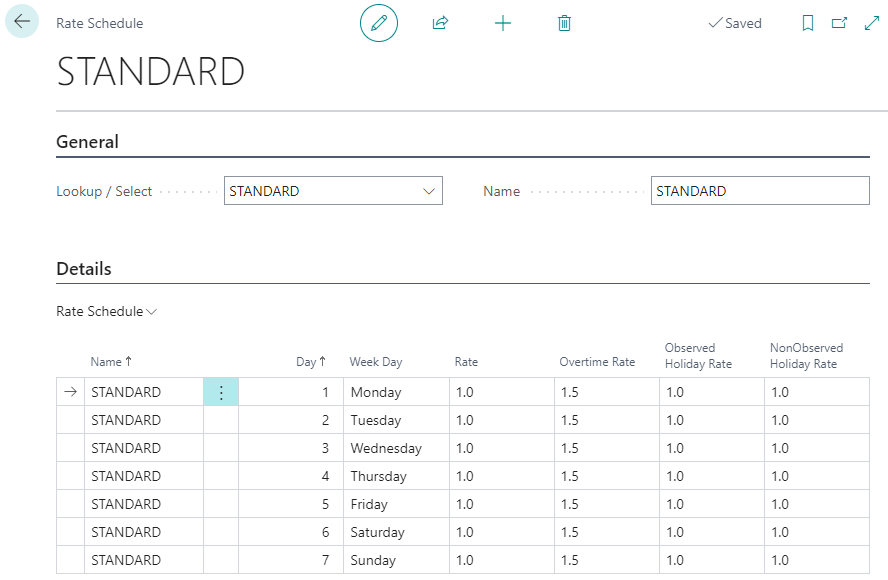
The Overtime Rate Schedule determines how the system calculates overtime. By default, the system comes with a schedule named STANDARD, which is the default, and one named CUSTOM 1 which is provided as an example but can also be modified and used or deleted. This is what the STANDARD schedule looks like.
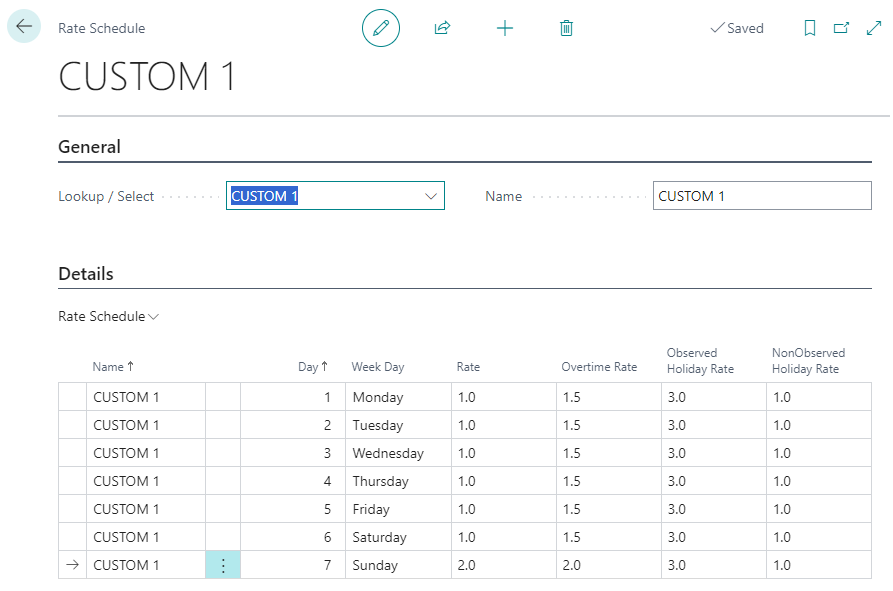
In the example below we are looking at the “CUSTOM 1” Overtime Rate Schedule that comes with the system. A company wishes to pay Triple-Time when someone works on a company observed holiday, and always pay Double-Time when someone works on a Sunday.
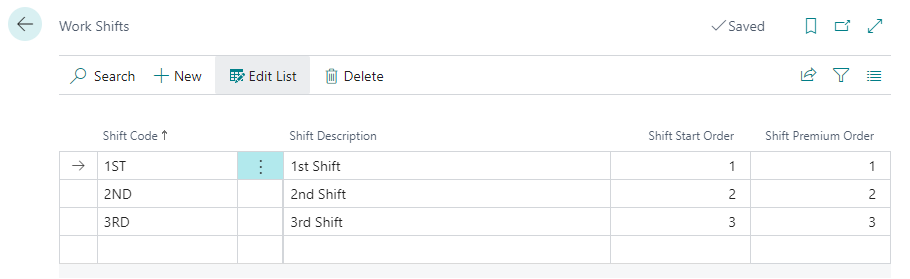
Work Shifts
At least one work shift must be configured. A work shift must be assigned to all employees. Even though they may fill in on other shifts, they must be assigned one as their primary shift assignment.
A typical setup would look like the following:
Email Scenario Assignments
In order for email notifications to work, they not only need to be enabled from (“Time-Configuration” page > “Approval & Notifications” Group > “Use Email Notifications” setting), but you may wish to have the following Email Scenarios assigned to an email account if you want to use an email account other than the default email account.
- Time – Timeoff Approval
- Time – Timeoff Submitted
- Time – Request Rejection
Approval Groups
(Documentation in Development. Please contact support@itclad.com for more information.)
The Time system come pre-loaded with generic Time Approval Groups. These can be used, renamed or deleted as desired, to represent the reporting structure in your company. Employees can be approvers of multiple groups, and multiple employees can be an approver for the same group.
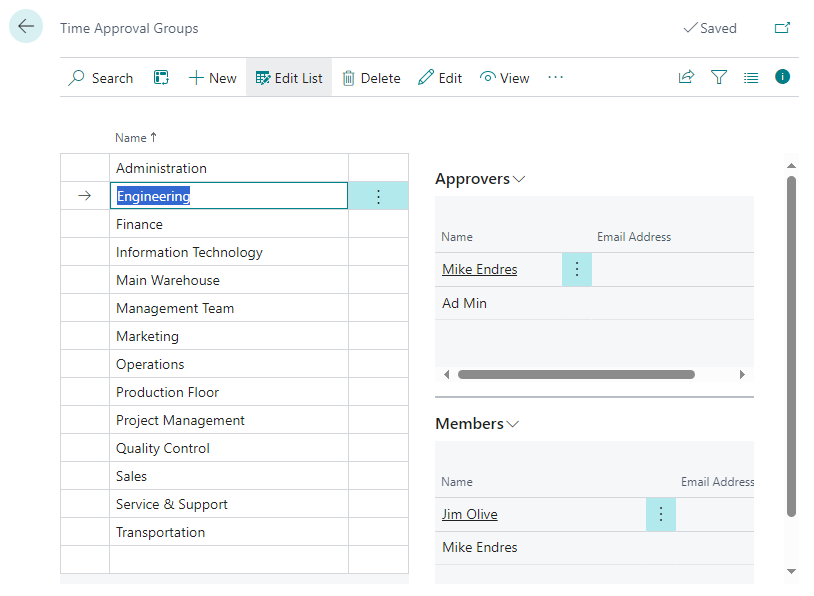
It is not recommended to have an employee be an approver for a group they are a member of unless they are a high-level employee who has been giving the responsibility of approving their own time. If someone is set as an approver for themselves, it may be possible for them to manipulate their Paid Time Off by deleting old entries so that new ones can be created. Time approvers need to have the integrity to help manage employee time for the company.
Manage Resources
This link takes you to the Business Central Resources list. This is here to aid in the workflow of onboarding or offboarding employees.
Manage Employees
This link takes you to the Business Central Employees list. The employee database table has been extended to include new fields used in the Time system. The new fields are available on the Employee Card, Employee List, and also on the Employee Template.
It is important that the Employee database table be restricted by permissions to only the people who manage employees and information such as paid time off days.
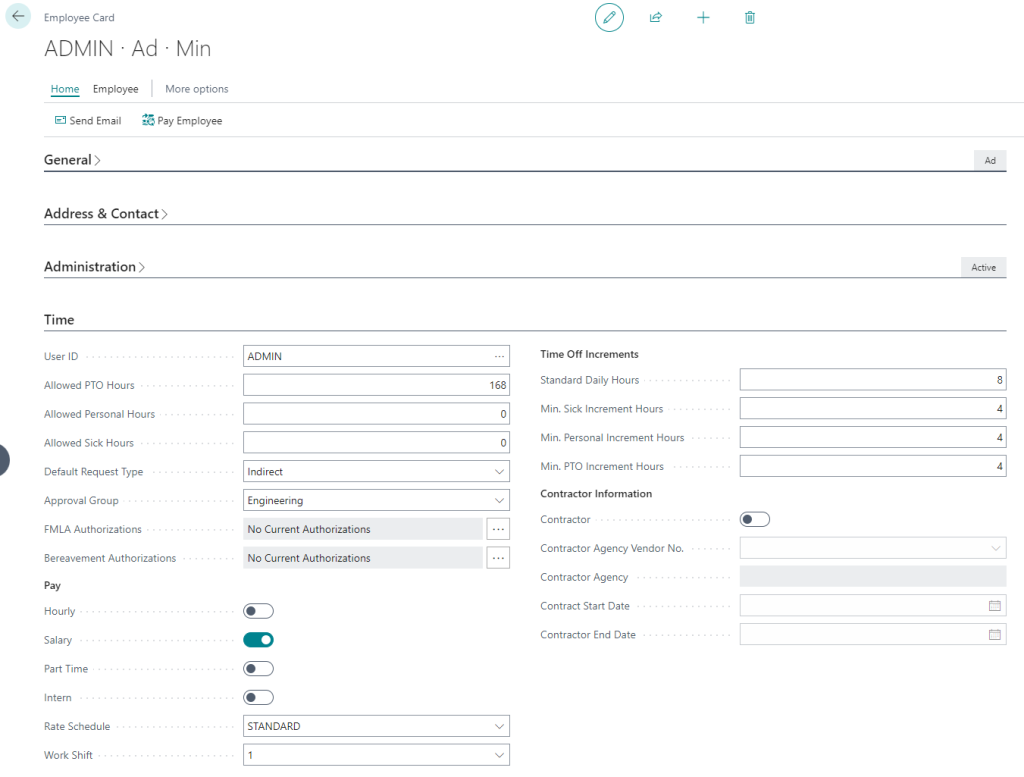
The fields are self explanatory, but with a couple of things to note:
- All employees should be assigned a Default Request Type.
- All employees will need to be in an Approval Group, or they will not be able to use submit entries.
- Standard Daily Hours represents how many hours an employee works during a typical day. This is used when displaying how many days of time off have been used or remain. The system stores time off as hours.
- By default the Min. Personal/Sick/PTO Hours is set to 4. This means the employee will only be able to request time off in that increment. The above image demonstrates that the employee will only be able to request 4 or 8 hours of time off (half day or full day).
- Bereavement & FMLA Authorizations need to be created before an employee can charge time with those types. This allows for better control over who can take that time off and for how long.
Request Types
(Documentation in Development. Please contact support@itclad.com for more information.)
Though there are built-in (time ‘system’) request types, you can create custom request types for employees to charge time to. For example, you could create a Request Type named “Non-Project Meetings” to track time in meetings that are not related to a job. This time could then be reported against later. Here is a filtered list of Request Types showing non-system types. Because these request types are not ‘system’, they can be changed or removed.
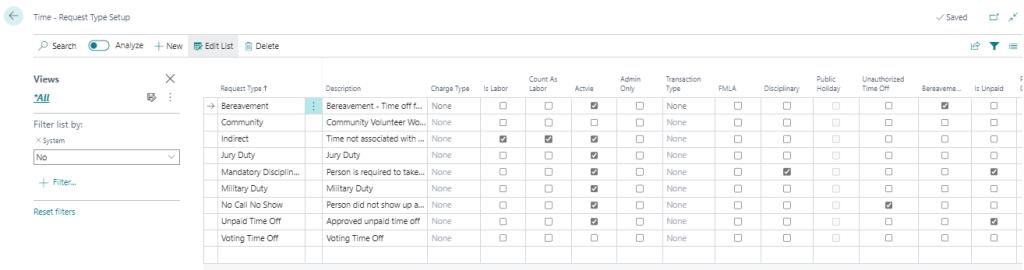
Below is an explanation of some key fields
Is Labor
Represents time physically worked by an employee, and must by US law be tracked for hourly employees.
Count As Labor
Any request type that ‘Is Labor’ must also ‘Count As Labor’, but there may be instances where you would like to count the request type as labor even though it is not physical work. When you ‘Count As Labor’, the labor will be counted when calculating overtime. An example would be where a company wants to allow time off for Voting or for Community Service but would still like the hours to count toward the calculation of overtime.
Active
If the check box is checked, the Request Type will show as an option for charging. Likewise, if the box is unchecked, it is not available for charging time to.
Admin Only
Only users who are set up as in admin in the Time system can create entries of this type. A company may wish to create a request type to represent time entries for manual disciplinary actions that only admins may create. The admin can create the entry on behalf of the disciplined employee and submit and approve them.
FMLA
If the request type is set to FMLA, it will require an FMLA authorization to exist before time can be submitted.
Disciplinary
This is for reporting purposes. Any time charged to these entries could later be reported against.
Unauthorized Time Off
Any time that an employee takes off without notice could be charged to one of these request types, if the company determines it does not count toward a paid time off type.
Bereavement
If the request type is set to Bereavement, it will require a Bereavement authorization to exist before time can be submitted.
Is Unpaid
Any request type that is not paid should be marked as ‘Is Unpaid’, so this may reported against.
Register Employee Absence
This will cause an entry to be created in the Business Central ‘Registered Absences’ list, with the Cause of Absence Code specified.
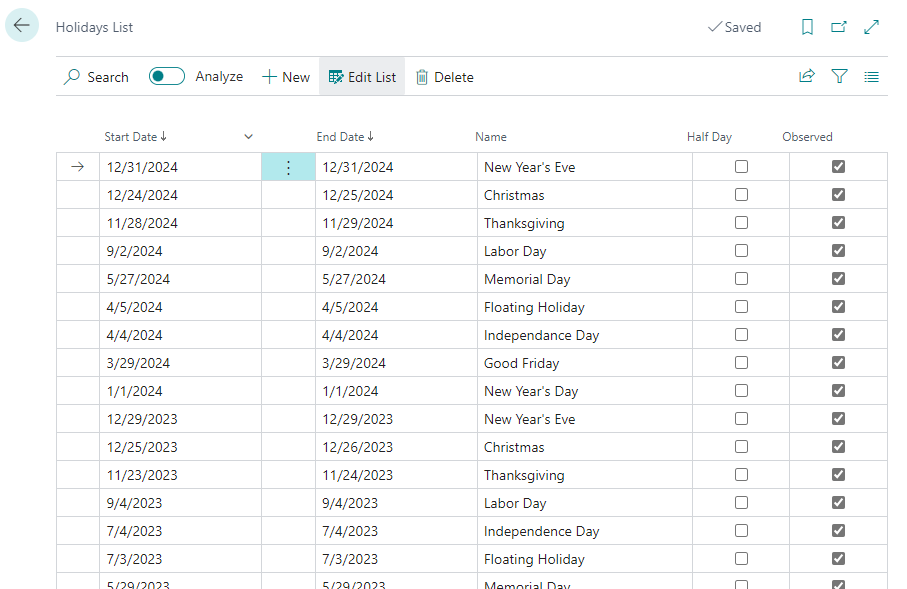
Holiday List
The company holiday list is the list of days that an employee may request the ‘Holiday’ request type. Holiday pay is based on the Rate Schedule. Holidays should be entered into this list in advance, so that employees may know when they are and schedule their time off accordingly.
Deposit Time Off
This will launch a wizard that will guide you through depositing time off for new employees or for all employees for the next year, at the end of the current year.
Request – Submit Cutoff Date
It is important to set this date whenever you do payroll for a date range and no longer want time entries created before a specific date. Example: Payroll is from Jan. 1 – Jan 14. You should set this date to Jan 15. This is the earliest day that someone may submit time for. If there was an issue where someone did not submit their time, and payroll was already done, you may wish to set this date back temporarily while the time entry is created. For now, you would need to manually keep track of the payroll adjustment for the next pay period, remembering to calculate if the time created overtime for the previous pay period.